This entry in the HyperShock Build Log will be the much sought after deep dive into our modularization system. Modules and motor pods are something we’ve always talked about and never had the time or bandwidth to figure out. We tried to use elements of modularization in some previous seasons, but it wasn’t until Season 5 that we really did it. We did it wrong and I’ll explain how wrong later. However, we learned so much from that impelmentation that we knew pretty much exactly how we wanted to design modules for Season 6. We have to start in Season 4 to tell the whole story.

[Season 4 drive motors]
When we switched to brushless drive for Season 4, we needed a controller that could keep up with our absurd demands. At Robot Ruckus 2018 we’d used six of the Trampaboards VESC 6 motor controllers to run a three-motor-per-side adaptation of Maytech 6374-190kv sensored brushless outrunner motors to replace the LEM 130s. The results were impressive, so Trampa made the shortlist. We tried a couple of different solutions but decided on the VESC 75/300 from Trampa. In our Power Distribution blog, I went into some detail about our wiring solution for the controllers that season. Essentially, the triple wire solution that the ESCs come with isn’t quite the right thing for our compact design requirements.
We used the 75/300s in Season 4 and they were one of the few things that we were really happy with about that design. The Revolt RV100E motors we used for the drivetrain got the job done but were very heavy and their size compromised our armor solution. That said, we liked them enough that we did intend to use them again for Season 5. Turned out, several other teams were impressed with how well our drivetrain worked too. So impressed they bought out the entire stock of Revolts. The estimated lead time put delivery about a month after filming would be wrapped up. Awesome.

Fortunately for us, we’re well adjusted to buying a bunch of motors and testing them out. We’d been considering these Lehners for a while, but we’d always been worried about their lack of thermal mass. Briefly, thermal mass refers to the mass in a motor that can soak up heat. Everything in a motor works as a heatsink for all the heat generated due to the ~10-15% inefficiency of brushless motors. Heat makes the magnets in the motor less efficient, meaning more and more heat is being generated just maintaining your power output. More importantly, there's a limit at which the motor catches fire, which is, uh, bad.
The mass, material, and geometric properties of the motor can have a large influence on how well the motor will perform when its pushed to its limits. Because we’re HyperShock, those limits are where we expect the motors to live for 3 minutes at a time. While the Lehners are slick, they don’t quite have the power output requirements we’d adopted after our success with the Revolt motors. They're also expensive. Like, 3-4x the cost of Revolt motors.

[Motor Collection]
We’d bought a NeuMotor 8038/140Kv a couple of years ago as a possible weapon motor. We tend to buy a lot of motors because we really have to test them since the ratings are generally nonsense. The Revolt’s we’d had some success with was about half that Kv. the "Kv" of a motor is a constant used to indicate approximate RPM per Volt. Simply, a 72Kv motor should spin at 720 RPM at 10V (this breaks down a bit at low voltages, but generally holds true). For a given size motor and given voltage, a lower Kv variant corresponds to higher torque. The trade-off is very low Kv motors are less thermally efficient at higher RPM due to their higher internal resistance. The higher internal resistance also means your motor will handle less power before the magic smoke comes out. Some handwaving to all this, but lower Kv usually means thinner winding wire inside the motor, thus the decreased thermal efficiency. We were fans of the beefier design of the NeuMotors as compared to the lighter and lower-rated Lehners. 140Kv was a little too high for a gearless reduction and we had no intention of using gears anywhere in the robot. NeuMotor also offered a 100Kv option in the 8038 size, so we bought a few of those to start testing with. The Revolt motors had come with hall effect sensors installed so we collaborated with Hijinx to design our hall effect sensors to install on the NeuMotors. A Hall Effect Sensor leverages a proportional change in voltage caused by the magnetic field. That magnetic field can come from a magnet or from an electromagnet. Motor controllers can use hall effect sensors to determine the approximate position of the motor rotor's magnets, improving the torque/performance of brushless motors when attempting to get a motor spinning at low speed. The downside of hall effect sensors is poor resolution of position sensing for motors, which means significantly hindered performance when the motor is stopped or jammed.

[S5 drive mounting]
Skipping ahead a few weeks, we were very happy with the NeuMotors and committed to using them for our Season 5 design. As discussed in the Power Distribution blog, that design split the robot into 2 main parts: the chassis and the “core”. The Core is further divided into the ESC and receiver tray, the battery box cage, and the floating motor mounts. We used bent titanium to hold the motors and attached them to the frame of the Core using shock isolators. The flaw in this setup was the somewhat-too-soft “wubs” flexed enough for the drive motors to slam into the screws holding on the top armor. While this didn’t cause a motor failure, punching dents into the motor cans is less than ideal. One thing the core design got right was the complete elimination of wire tension. Since every component had an assigned position in the robot and at worst very limited movement, the wiring was set up such that nothing could snag a wire nor could the distance between any two points change by enough to pull a wire loose. Even if all of the armor was removed, all of the electronics would still be firmly in their places.

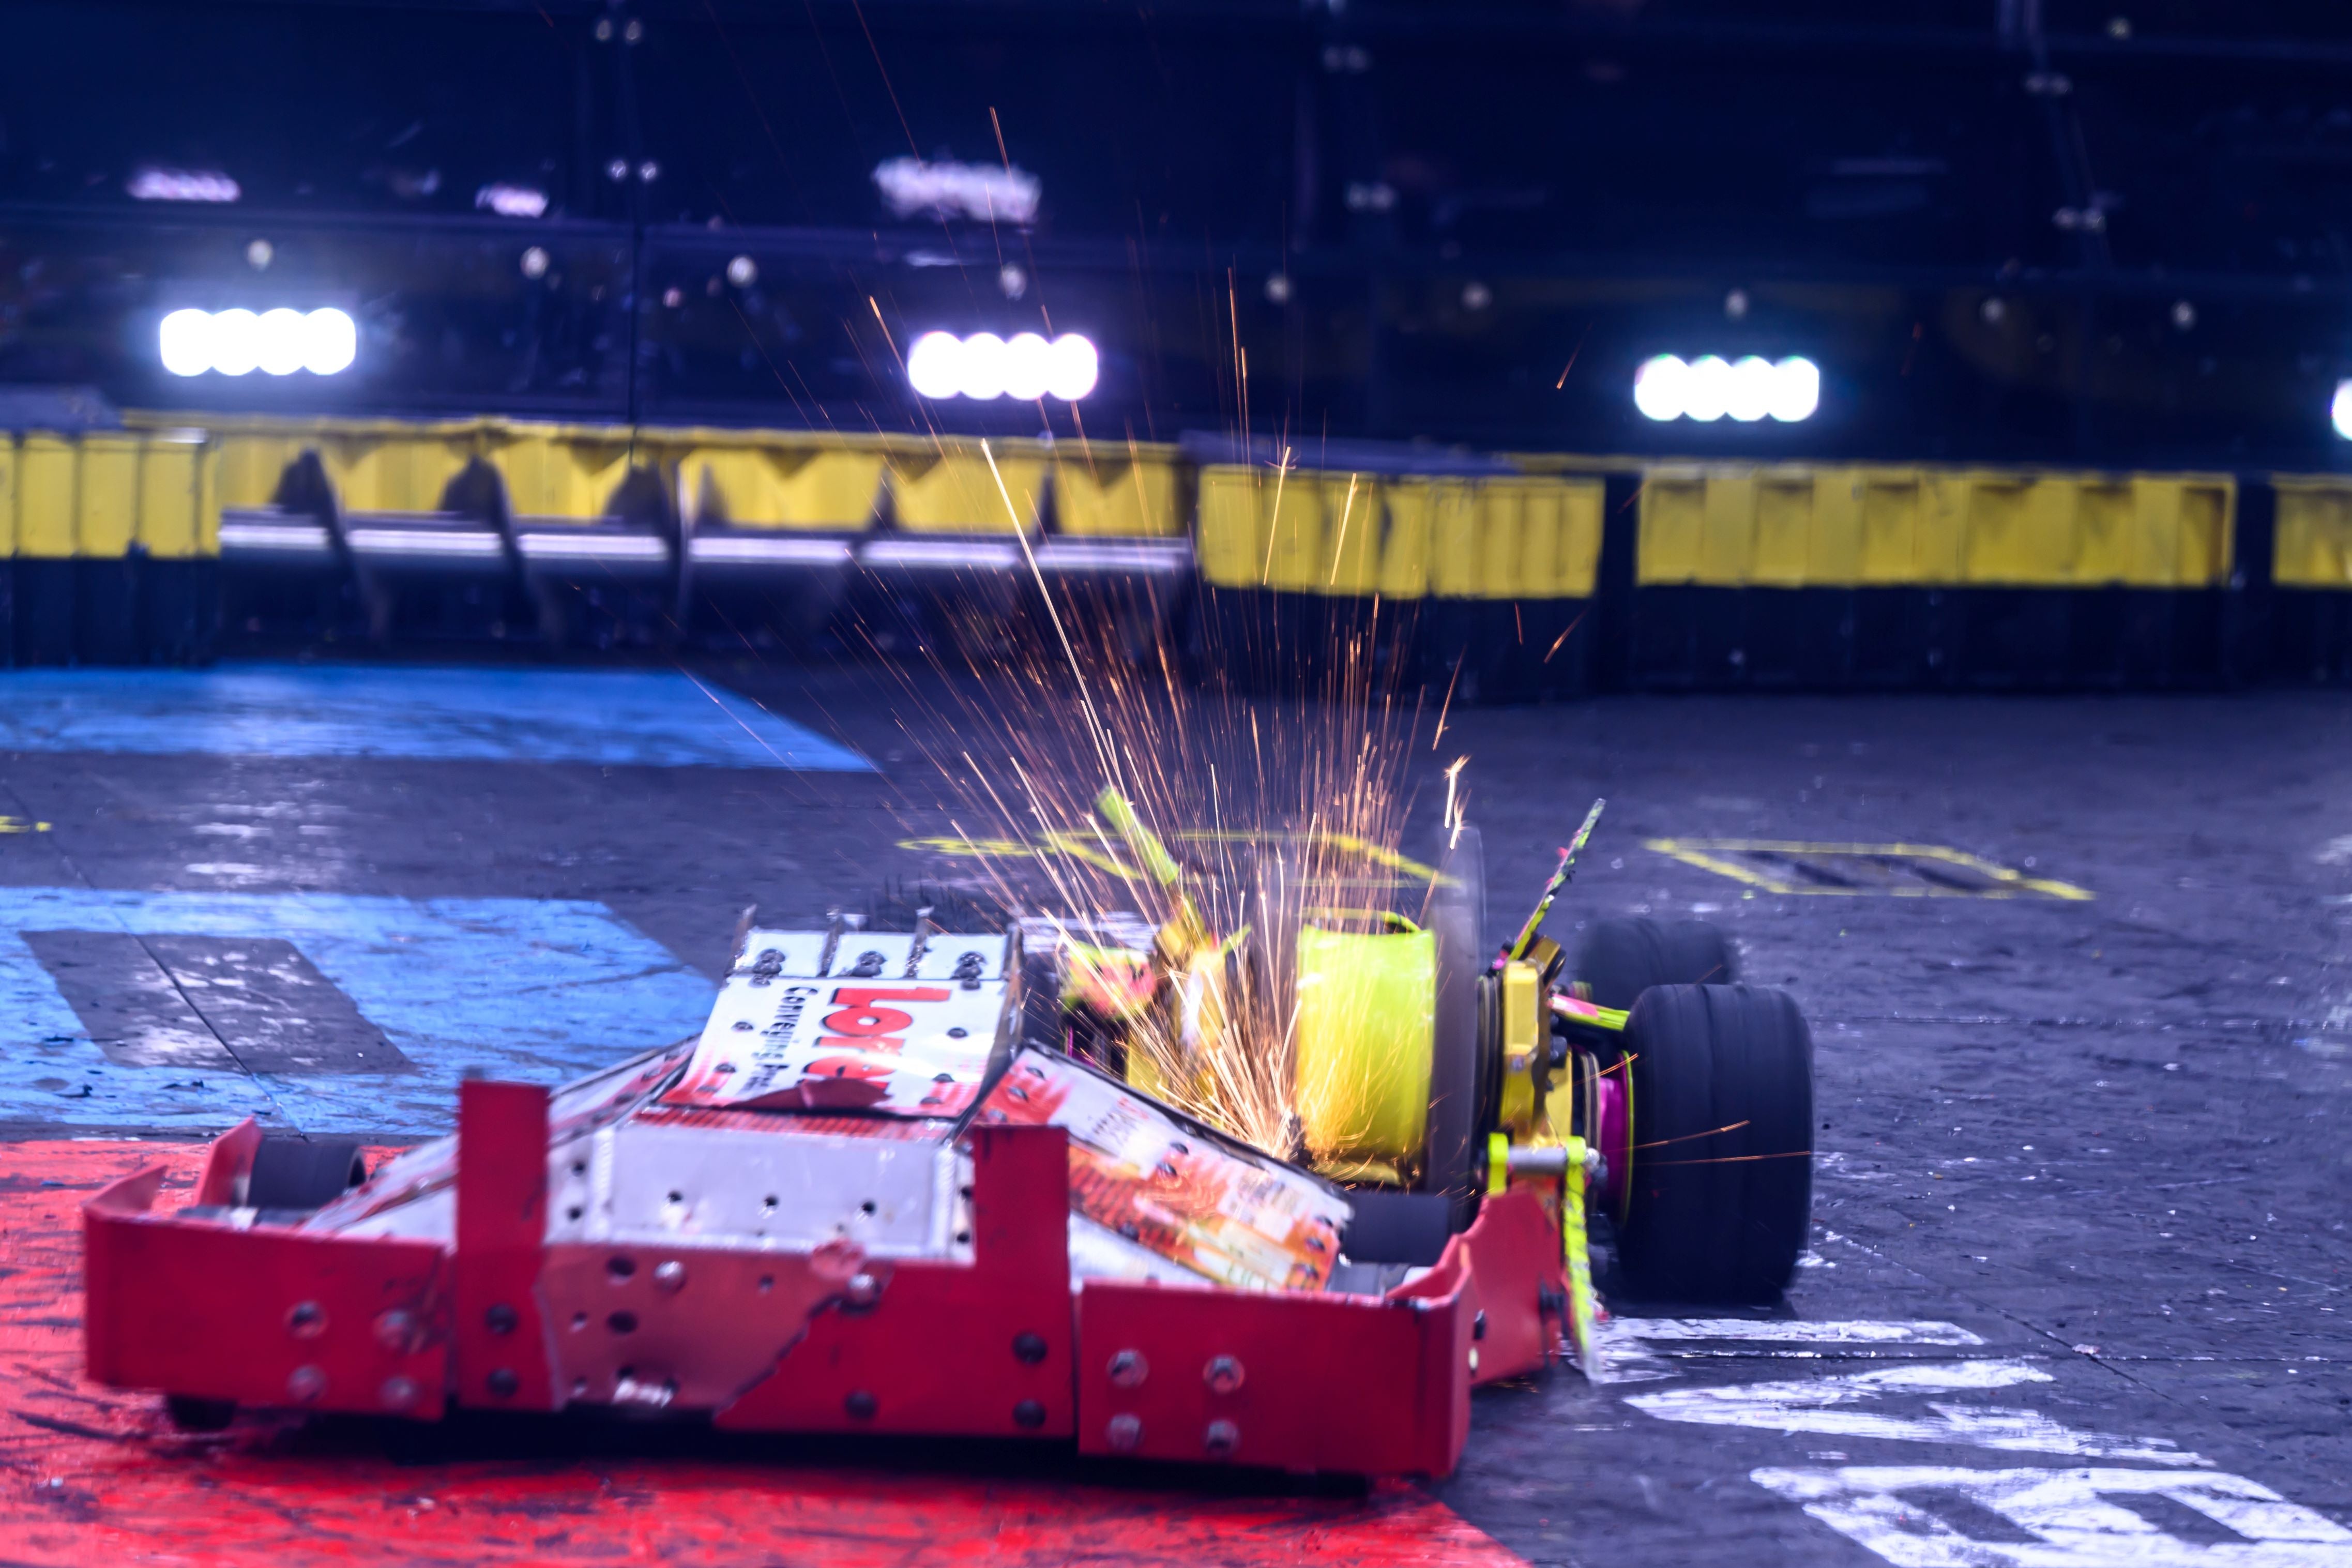
The grand flaw in the Season 5 design was the inherent nature of the removable core. Since it dropped out the bottom of the robot, inserting or removing it required no less than three sets of hands, four if the weapon was installed. Installing the weapon afterward was at least a two-person operation. Two people are needed to hold the robot above the core while a third connects the drive chains from the chassis to the drive motors. Lowering the chassis onto the core was a delicate operation since the rear of the chassis had to slide under the back of the core. We could swap any component out in under fifteen minutes with at least four team members, but it was sweaty and shouty work. We were also somewhat underwhelmed by the motor performance when under extreme loads. At the end of our fight against Mammoth, we were unable to drive out from under them. In part, it's because one wheel was jammed, but that shouldn’t have been enough to prevent the other side of the robot from moving. We concluded that the hall effect sensors weren’t giving us enough of a boost to start-up performance. Wasn’t anything we could do about that then, so we just tried to keep going as best we could.

We decided to start experimenting with magnetic encoders since they give a more persistent read on the motor position compared to the hall effect sensors. One issue with halls is they don’t give a particularly useful reading until the motor is already moving. It doesn’t have to move very much, but halls do very little to overcome motor cogging (a motor “twitching” due to a lack of torque). The amount of rotation during cogging can be less than the rotation required for the halls to provide any usable feedback. The VESC firmware calls out a handful of magnetic encoders, but the global chip shortage made them tricky to find. We did manage to get a few, and after some initial testing, decided on the AS5047 chip. Well, that wasn’t available. So we did some digging and found out there is an AS5147 chip which is the same except it’s “automotive qualified.” Turns out, cars can experience massive shock loads, who would have guessed? The AS5147P chips we ended up ordering would perform the same as any AS5047 chip, but they’re also rated for massive shock loads. See page 22 of the AEC-Q100 Rev H document linked here for details.
HyperShock Encoder Testing
The AS5x47 chips also use magnetics to read a position. Instead of the magnets in the rotor that hall effect sensors use, these require a centrally mounted magnet on the axis of rotation that's specially magnetized laterally across the face of the magnet. These sensors are basically little compasses looking for the magnetic field from a tiny magnet spinning around. So, we took these fancy magnets that come with the dev samples and pressed them into a hole in the end of our shaft. Boy, did these work like a dream! Once we were satisfied with how the encoders worked in basic testing, we moved on to more serious tests. We designed and printed a hub to connect the motor to a weapon disk, then mounted the motor in a vise. NOTE: any spinning mass can suddenly become or create an uncontrolled projectile. Take precautions such as putting distance and solid, sturdy barriers between people and any spinning parts. We strongly recommend against testing in any area without controlled access.

At this point we’d achieved something that we hadn’t yet done in five seasons of BattleBots: we would be using the same motors and controllers two seasons in a row! The only major change to the drive chain would be the encoders in place of the Hall Effect sensors. We ended up testing those encoders much more extensively than we ever had time to do with the Hall Effect sensors. We’d learned a lot from our experiment with modularizing the robot. The mistake illustrated by that design was making everything fit on one big module. For Season 6 we took the module concept and applied it separately to each of the power systems.

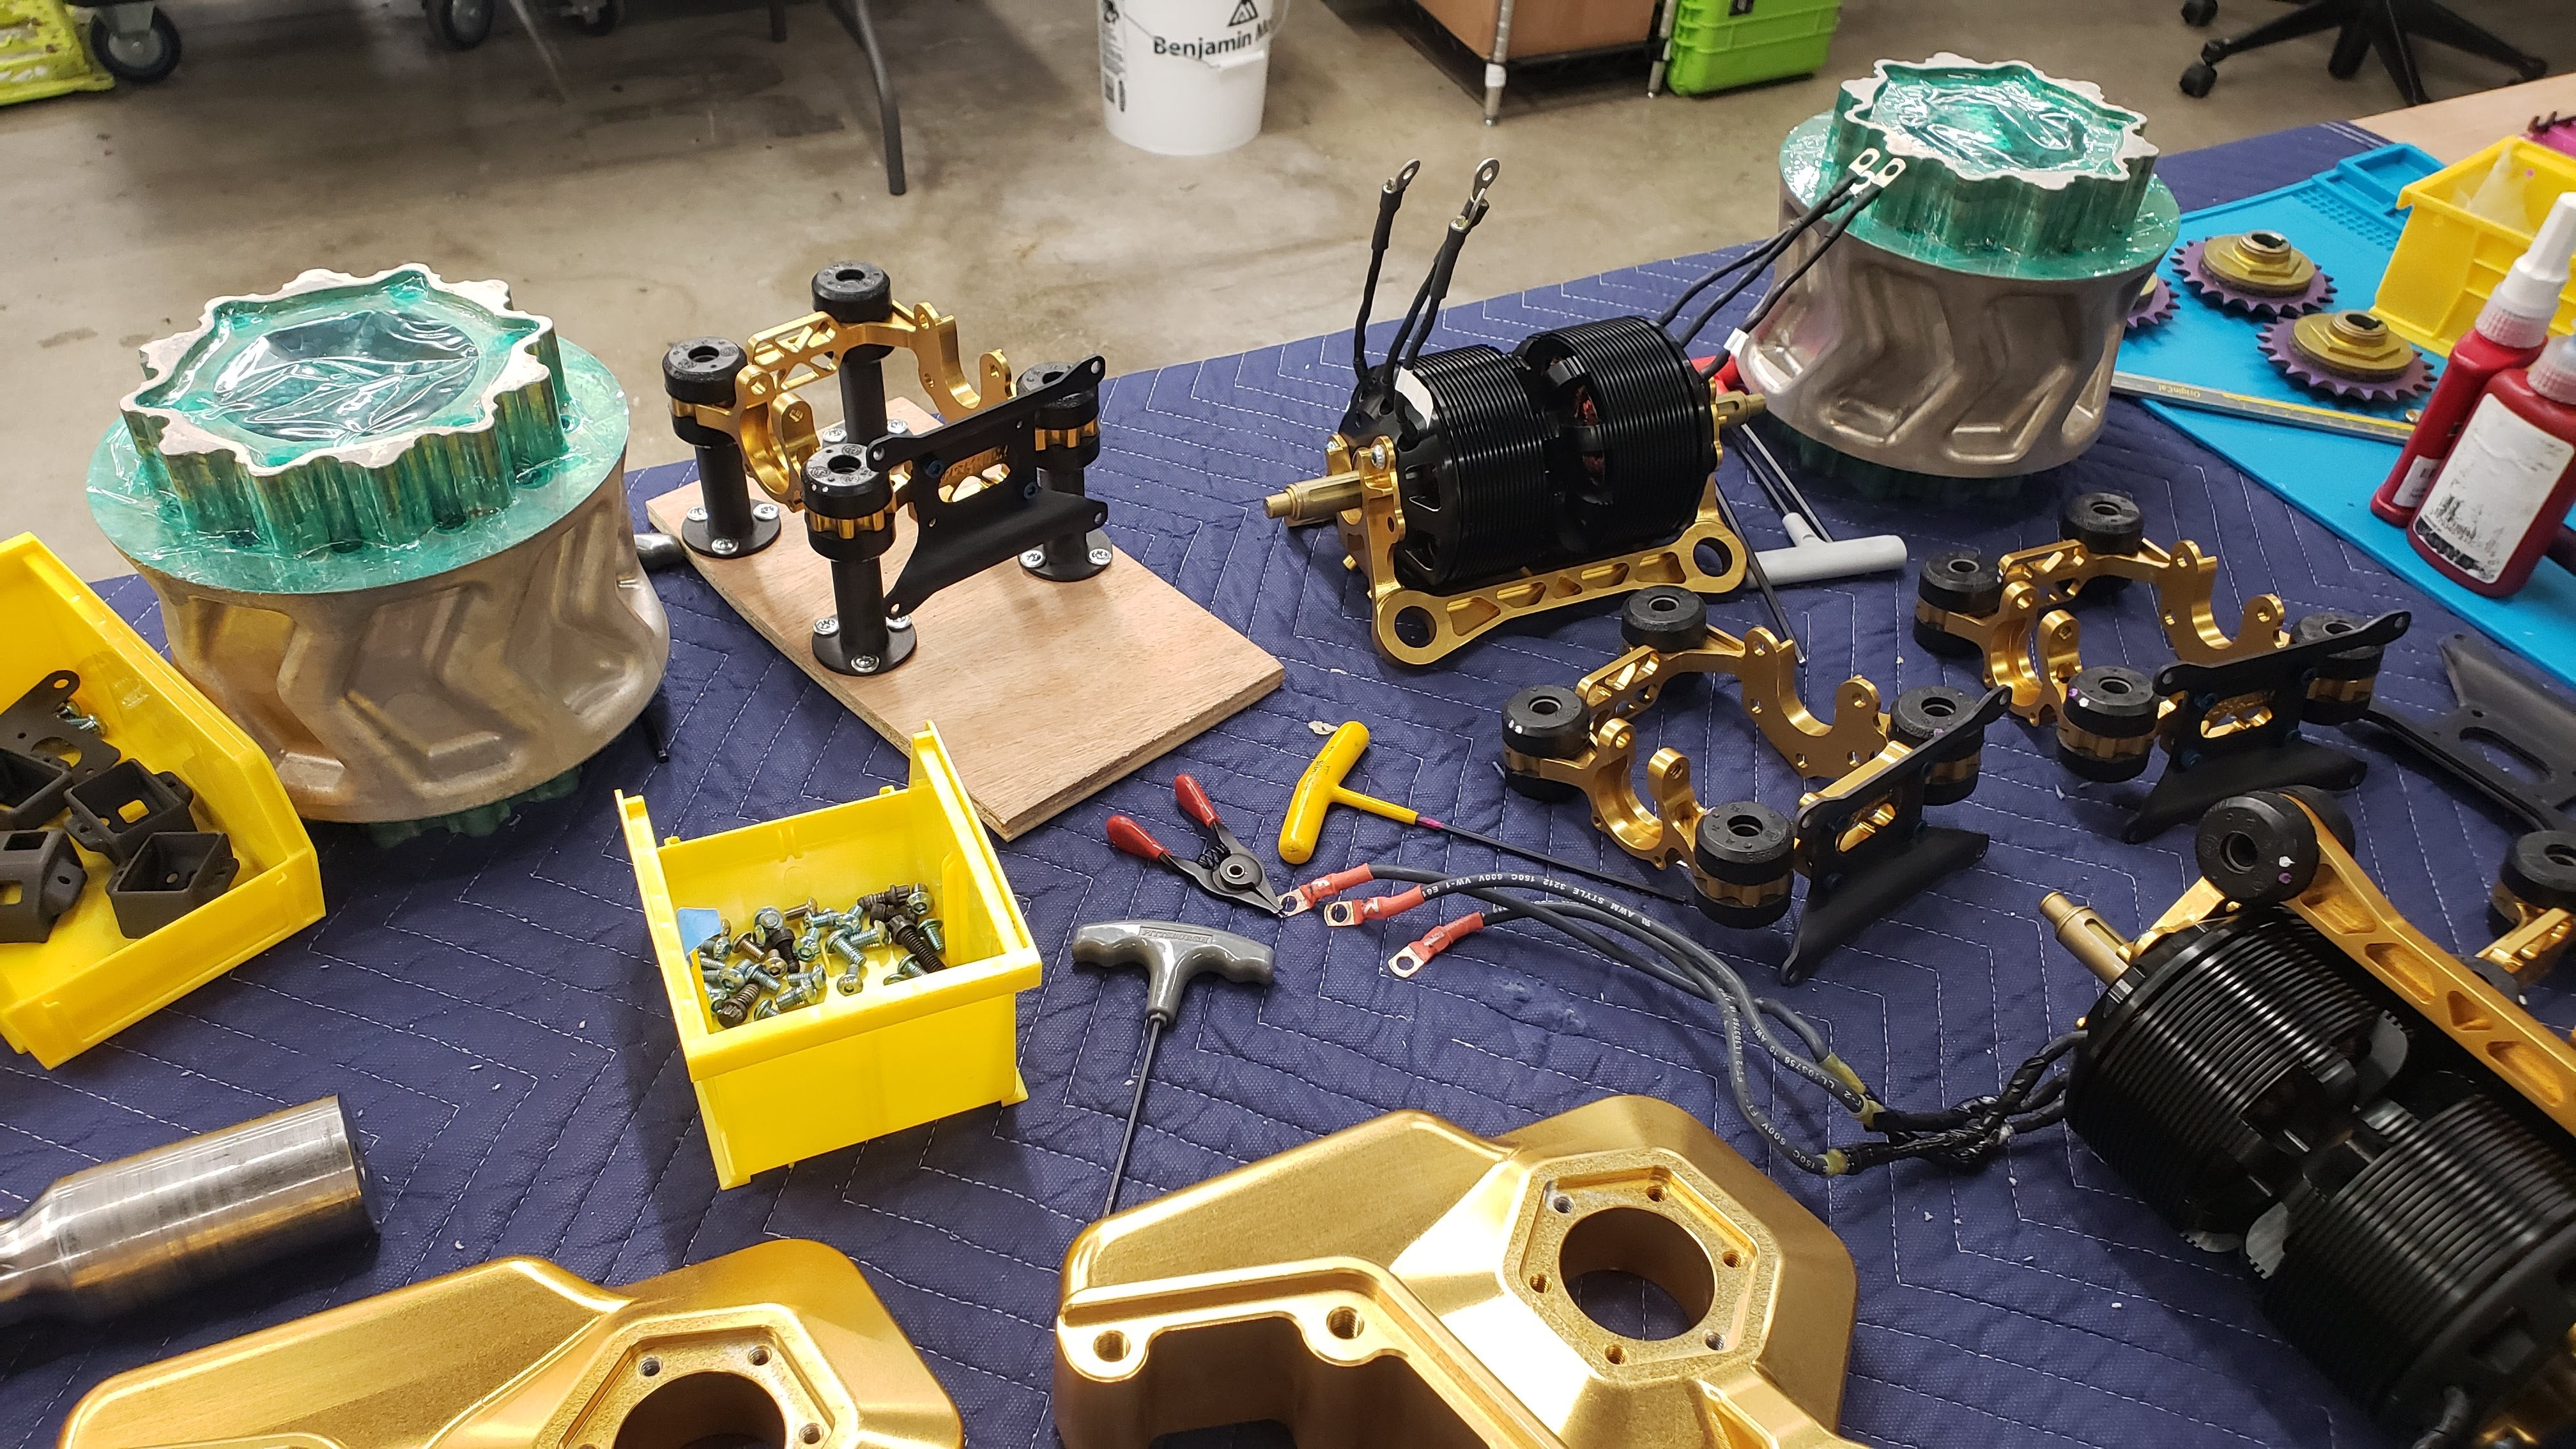
Before diving into the complete modules, the customized Trampa VESC 75/300s deserve some attention. First things to go were the wires. They’re bulky and don’t add any value by being so bulky. We replaced them with redcube studs. The redcubes were pressed into copper busbars and plates. For the output side, we just needed plates to solder onto the pads. The input side required a little more finesse. We used busbars to connect the 3 sets of solder pads for the positive and negative inputs with a 3D printed spacer between them. All redcubes extended out the top of the unit. Between the bottom of the PCB and the heatsink we added a substantially improved thermal pad. Since we changed the shape of the heatsink, we had to make custom silicone gaskets and pressure pads. We replaced the connectors for the receiver and encoder with Molex MicroClasp connectors. As much as we enjoy hotgluing all of our connectors on, we felt safer with a built in clip adding security. Topping it all off was a custom lid. We’d tried to make the lid really cool, but we misunderstood how mask layers worked so it ended up a little messy the first time. The replacements didn’t arrive in time for filming, so the ugly lids were what we competed with.

In this sixth iteration of HyperShock, we have 6 modules in the robot: a pair for drive motors and controllers, switches, weapon motors, weapon ESCs, and the battery box. By separating the modules, we can have a team member working on every module simultaneously. This also means we can have spare modules built up and ready to go to drop our turnaround time and agony to almost nothing.

Each drive side has a module comprised of a NeuMotor 8038/100kv, an AS5147P magnetic encoder on a custom PCB, a Trampa VESC 75/300 in a custom housing, and a Spektrum SR215 receiver. The frame of the module is 6061 aluminum and the bracket holding the ESC is 5052 aluminum. We used carbon fiber to create wire tie-down points and a mount for the receiver. The entire module mounts to the chassis using four rubber vibration dampers with steel inserts, all secured with a ⅜-16 12-point bolt threaded into a rivnut in the frame. The two mounts on the inner side of the frame are shared by the switch mount. In true HyperShock style, all of the aluminum is anodized. We sent out for the gold anodize, but we did all the pink and black anodizing ourselves. The titanium shafts in the motors are custom, repurposed from Season 5. Partially to save weight, but also so it's all one thickness rather than the necked down output shaft the motors ship with. We also need more length on the back of the shaft to double support it. A less exciting advantage to building modules like this is we can minimize the weight wasted on wire as well as ensure they’re absolutely not at risk of being torn out by tension.

The weapon power system is comprised of two modules: a pair of 8038s on a common titanium shaft in a subsframe and their ESCs on a carbon-fiber tray. In Season 5 we used a single 8038 to spin the weapon. Combined with the reduced disk weight, we found that weapon to be anemic. Spin-up time was pretty good, but the hits were lackluster and the follow-through was nonexistent. The increased weight would have been enough reason to increase the available power, but we wanted bigger hits and more follow-through too. The most effective hits are often the second or third hit on a robot that’s been sent tumbling. We doubled up on motors and linked them on a single shaft, effectively creating an 8086 motor. Each motor and controller has its own encoder. Not sure why, but a lot of people told us this wouldn’t work and the ESCs would fight each other. We were a little nervous the first time we spun the weapon up in the test box (yes, at filming. We know.), but it worked fine. Some further tuning was necessary to improve it, and we did a bit more after our first fight (mostly increasing current limits). The weapon ESCs had the same set of modifications as the drive ESCs: stud connectors for ring terminals, custom housing and lid, and clip-in Molex connectors for the receiver and encoder inputs. The ESC tray was bolted to the top of the battery box. Not the most elegant assembly considering the care put into the rest of the modules, but it was light and efficient. This also simplified the USB access for the VESCs if we needed to tune the weapon while in the test box. The mount for the weapon motors is 6061 aluminum, also anodized gold. We 3D printed mounts out of onyx for the encoders and used a small carbon fiber plate to retain them.

The sprockets on the mirrored ends of the weapon motor shaft are connected via half a slip clutch. We simply didn’t have the space for a complete slip clutch. We removed one of the friction plates and used all the green loctite we had. After our first fight, the slip clutch on the left side of the assembly unscrewed since they’re right-hand threaded. We prevented that from happening again by tightening them down and having Lincoln Electric weld them in place.


Share:
HyperShock Armor | Form and Function
Wheels | HyperTires: Foam Filled and Ready for Action